
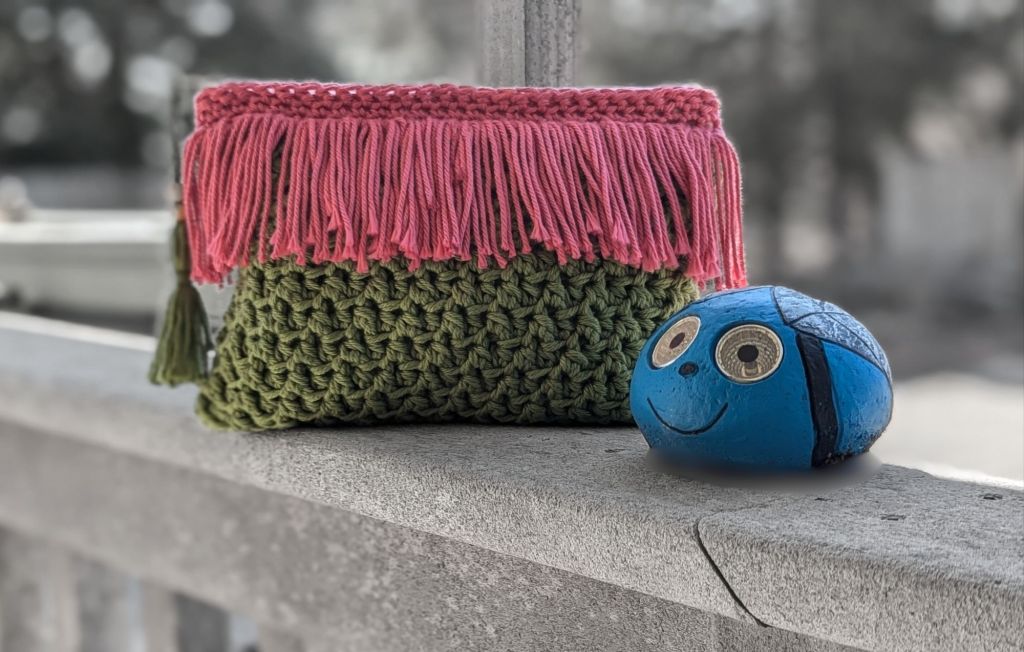
Do you want to add a pop of color and personality to your style? The Raspberry Groove Clutch is the perfect accessory to add to your outfit. This bag is incredibly versatile! It can serve as a makeup bag or a stylish carry-all.
There is something appealing about a handmade clutch. The Raspberry Groove Clutch came to life while I was playing with crochet stitches using raspberry and green yarn. I love the combination!
With its retro colors and fringe, the Raspberry Groove Clutch makes me want to flash the peace sign to everyone I pass. I’ve made it practical too, with a zipper pouch insert, because a great bag should be both beautiful and reliable. It’s the perfect accessory for days you want to feel playful and a bit romantic.
Whether you are making this for yourself, a friend, or someone who needs a little love, I hope the Raspberry Groove Clutch brings you joy!
Supplies Needed
- Approx 360-405 yds of size 4 medium-weight cotton yarn. Since you will be holding 2 strands together for most of the pattern, you may want 2 skeins of yarn to pull from. While there are alternative methods to accomplish this, most find it easiest pulling from 2 skeins. I used I Love this Cotton by Hobby Lobby in the colors green and raspberry. Green being my main color. Raspberry being my contrasting color. Using different color combinations creates different vibes. There are no rules for the color pairings, so feel free to be creative.
- 6.5 mm and 5.0 mm hook or size needed to obtain gauge
- Zipper canvas bag 9 in x 7 in
- Scissors, yarn needle, tape measure, stitch markers, cardboard for making fringe, sewing needle, thread to match the contrasting color
- 2 beads or other embellishments for the zipper pull, as well as a bit of leftover yarn, a small yarn needle or crochet hook to attach beads to yarn
This project requires you to hold two strands of yarn together while crocheting, as well as a single strand. If you aren’t familiar with holding two strands together, there are a few methods to accomplish this.
- Wind your own double-strand ball before beginning the project. Start by center-pulling both skeins of yarn you want to use. Hold the strands together and wind them into a new ball. Feel free to use your yarn winder—I adore mine! Once finished, you’ll have a double-strand ball (or cake, if you used the winder) ready to go like a single-strand ball. This method really helps reduce tangles.
- Work from the center of center-pull yarn. Pulling from the center of each skein makes handling multiple skeins of yarn so much easier! I used this method before I had my yarn winder, and it worked great! It cuts down on the tangles!
- Try using yarn bowls. Pop each yarn ball into its own bowl to keep them from tangling, especially when handling multiple strands. While there are gorgeous yarn bowls available, you don’t need to spend a lot. Visit your local thrift store and find treasures that could double as yarn bowls. Think teapots, planters with drainage holes, or colanders. Even an empty coffee container can be a great option! The possibilities are endless and fun to explore!
- Work from both ends of the same skein. This is my least favorite method! If you want to use the same skein for a double-strand project, you can pull from the center and find the outside end. Holding the ends together, crochet! This method can be tricky for larger projects, as the yarn might tangle. Who am I kidding? I always tangle! However, it can be a great way to make the most of your yarn stash.
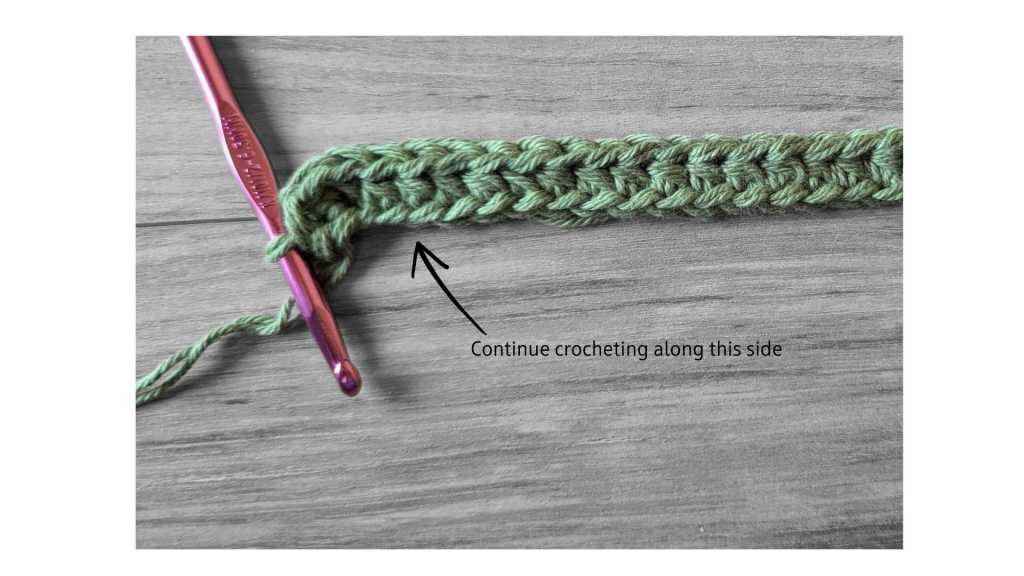
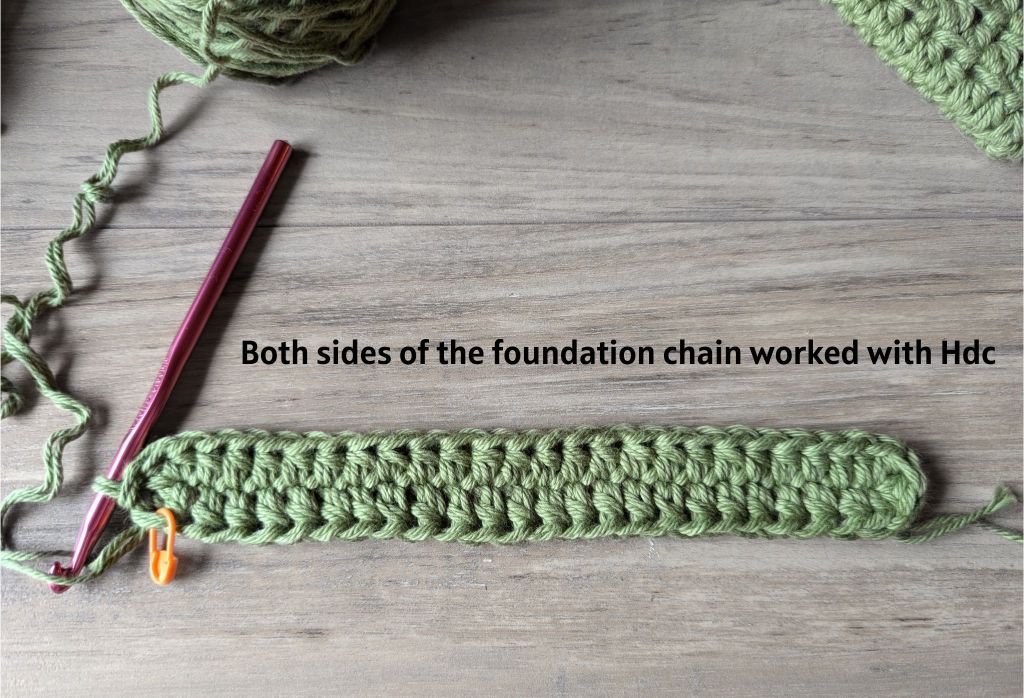
Before you jump into this project, here’s a handy tip to remember: you’ll be crocheting on both sides of the foundation chain. You can do this, honest! Start by creating your foundation chain and work the stitches required into the back bump of your chain. When you reach the last stitch, work the required number of stitches into it; this will turn your crochet piece like a little corner. I’ve included a photo below to show the magic. Now, continue crocheting down the other side of the foundation chain, using both the front and back loops. You will have crocheted both sides of the foundation stitch!
Terms Used and Abbreviations
Pattern is written in US terminology.
- Back Loop Only – BLO
- Chain – ch
- Double Crochet – dc
- Front Loop Only – FLO
- Half double crochet – hdc
- Herringbone Half Double crochet – HBhdc
- Repeat – rep
- Right Side – RS
- Single Crochet – sc
- Skip – sk
- Slip stitch – sl st
- Space(es) – sp(s)
- Stitch(es) – st(s)
- Wrong Side – WS
- Yarn over – YO
- * – Repeat directions given from *
- [ ] – Work stitches within [ ] as many times as directed
- ( ) – Work stitches within ( ) in the same stitch or space
Special Terminology
Herringbone Half Double Crochet- HBHdc
YO, insert hook into the next stitch, just like you would if making a normal hdc. Photo 1 HBHdc. YO and pull through both the st and the 1st loop, there will be 2 loops left on your hook, Photo 2 HBHdc, Yo and pull through the remaining 2 loops. HBHdc completed. Photo 3
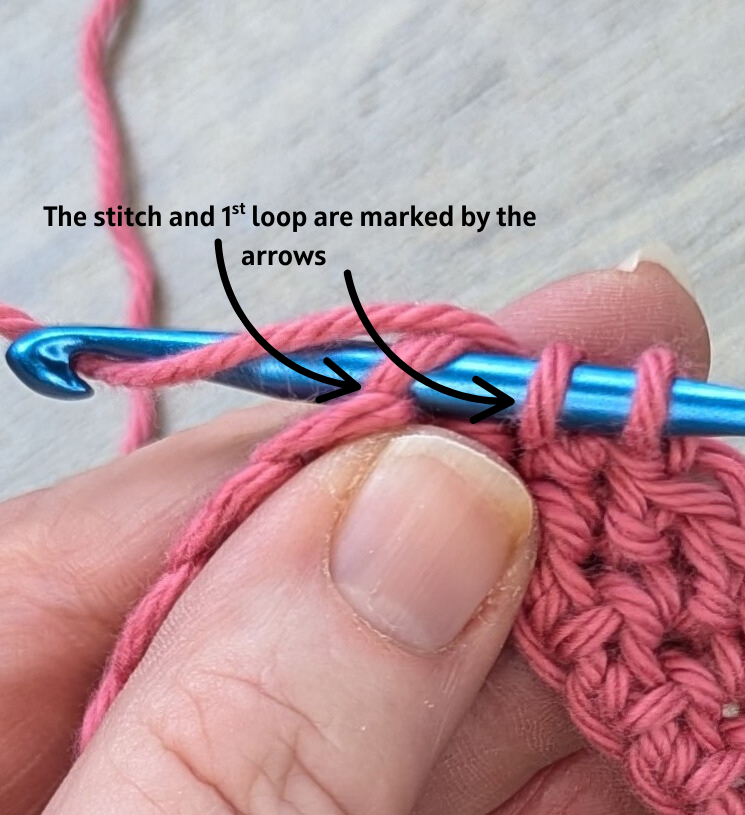
Photo 1 HBHdc

Photo 2 HBHdc
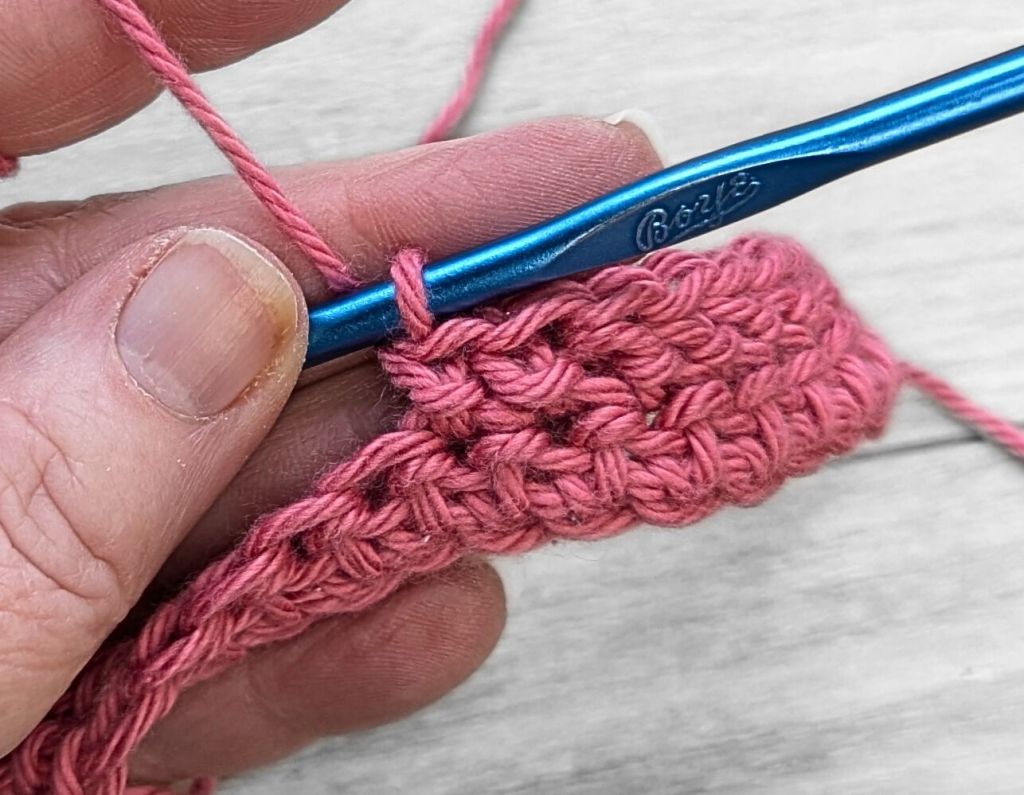
Photo 3 HBHdc
Pattern Notes
- You will be holding 2 strands of yarn together and also a single strand. I will note where to use each.
- Crocheting on both sides of the foundation chain.
- You will be making fringe
- You will be working in a spiral, do not join with sl st to complete rounds unless directed to.
- Inserting a premade zipper canvas bag into the crochet bag.
- You can use an invisible join or sl st on the last round
Gauge
Achieving the correct gauge is crucial for this project. If your stitches are too tight, your bag will bunch up, whereas if they are too loose, it will sag. Neither of these looks are pleasing, so it’s essential to verify your gauge. If you must choose between a tighter or looser gauge opt for a slightly tighter gauge.
11 hdc x 8 hdc = 4 in x 4 in
Swatch rulers make checking your gauge simple!
Finished Measurements
Lying flat the bag will be 7.5 inches wide X 9.5 inches high.
Making Fringe
You will need fringe after completing round 14. I typically use my hand to make fringe by wrapping the yarn around my hand, which gives me an 8-inch strand. Not very scientific but it works well for me. Alternatively, you could use a piece of cardboard cut to a width of 4 inches or whatever length you want your fringe to be. Example: If you want your fringe to be 4 inches long, you will need a piece of cardboard cut to a width of 4 inches.
Wrap the yarn around and around the cardboard, being careful not to wrap it too tightly, as this will affect the size once you cut it. After you have wrapped enough yarn, cut along the bottom edge of the cardboard and you will have an 8-inch piece of yarn. For the fringe, you’ll need approximately 104 pieces of yarn.
Instructions
You will be working in a spiral, adding fringe then inserting a prefab zipper bag. Then sewing the crochet bag to the premade zipper bag. Finally adding a bit of flare to the zipper pull with your tassel.
Please show your support by pinning! Thank you!!
To skip the ads and get a printable PDF of this pattern, you have the option to buy it at an affordable price from my Etsy and Ravelry shops.
Let’s get to it!
Using the main color hold 2 strands of yarn together and chain 26.
Chain loosely. You will work into both sides of the chain so you don’t want your chain to be too tight.
Place a stitch marker in the first hdc of each round. This will help locate the start of each round.
Rnd 1: 1 hdc in back bump of 2nd ch from the hook. 1 hdc in each back bump to last ch. 3 hdc in back bump of last ch st. Do not turn. Work 1 hdc in each st to last ch, being careful to work in both front and back loops. 2 hdc in last ch st. Do not turn. (52 hdc)
Rnd 2: * 1 hdc in blo of next st, 1 hdc in flo of next st * repeat 25 times. (52 hdc)
Rnd 3: Repeat round 2
Rnd 4: Repeat round 2
Rnd 5: Repeat round 2
Rnd 6: Repeat round 2
Rnd 7: Repeat round 2
Rnd 8: Repeat round 2
Rnd 9: Repeat round 2
Rnd 10: Repeat round 2
Rnd 11: Repeat round 2. Change color to raspberry or your chosen contrasting color in the last st using a single strand (52 hdc)
You will use a single strand of yarn and the smaller hook in the next rounds.
Rnd 12: 1 Hdc in next 2 sts, 1 sc in each st to the end. Join with sl st to 1st hdc. ( 2 Hdc, 50 sc)
If you haven’t made your fringe, now is the time to do it.
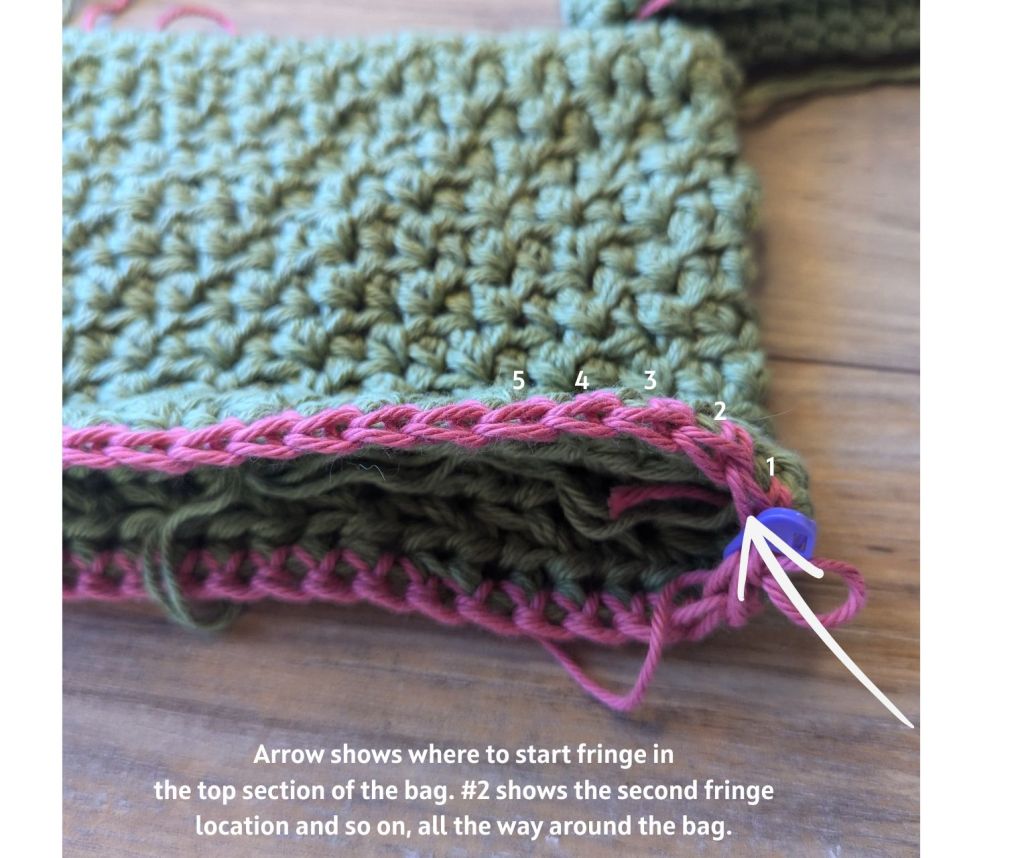
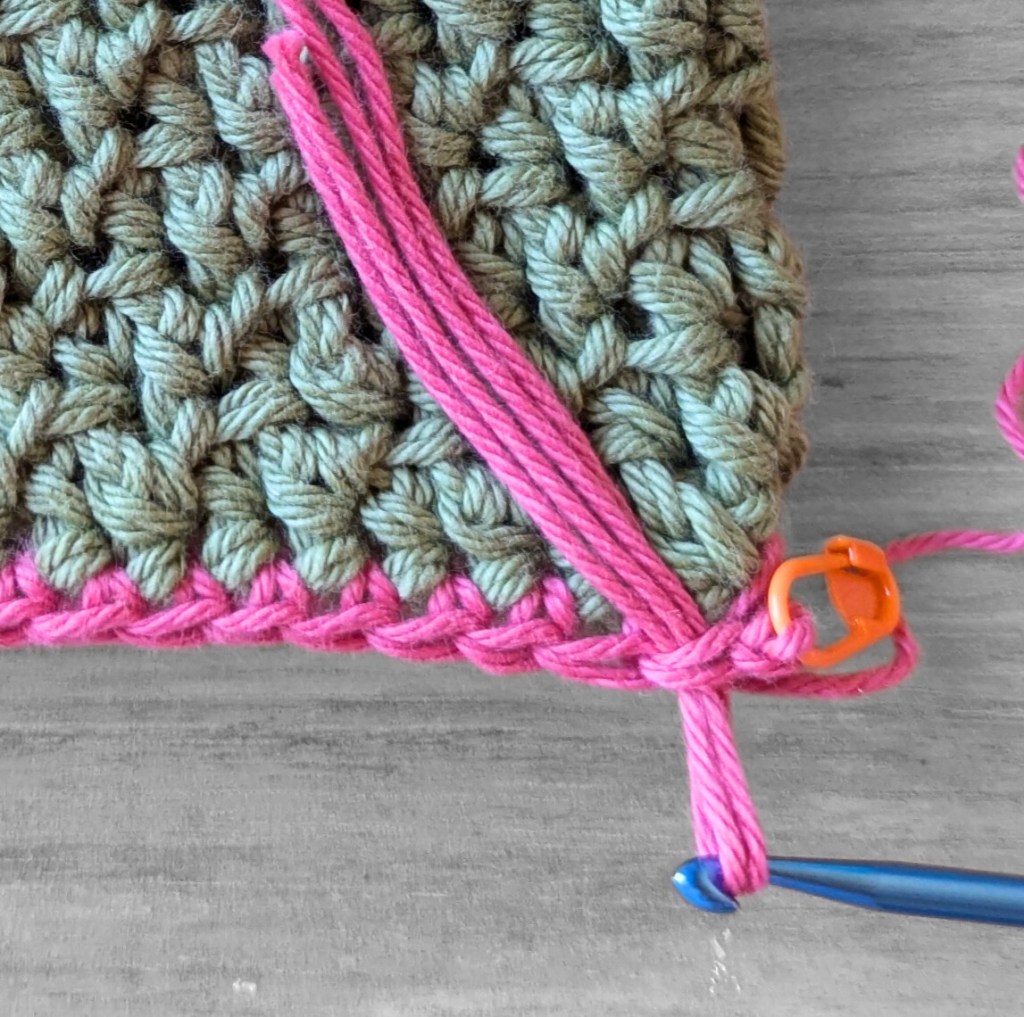
Rnd 13: You will be working counterclockwise for the next two rounds. Place your bag flat on your work surface with the opening facing you. You will be adding the fringe into the top section of the bag being sure to work counterclockwise after each fringe is completed.
Remove the hook from the working loop and place a stitch marker to secure your working yarn. Insert the hook through the next st, place the center of 2 folded strands of fringe yarn over the hook, and draw through the loop on the hook. Pass the ends of the fringe through the loop created by the fringe and pull gently to secure. Your fringe should hang down on the RS rep from * to the end of the round. (52 fringes) The next 4 photos show creating fringe.
Note: Don’t tighten the fringe too tightly because you will be working into the fringe in the next round.
Inserting your hook.
Placing fringe strands on hook
Pull fringe strands through
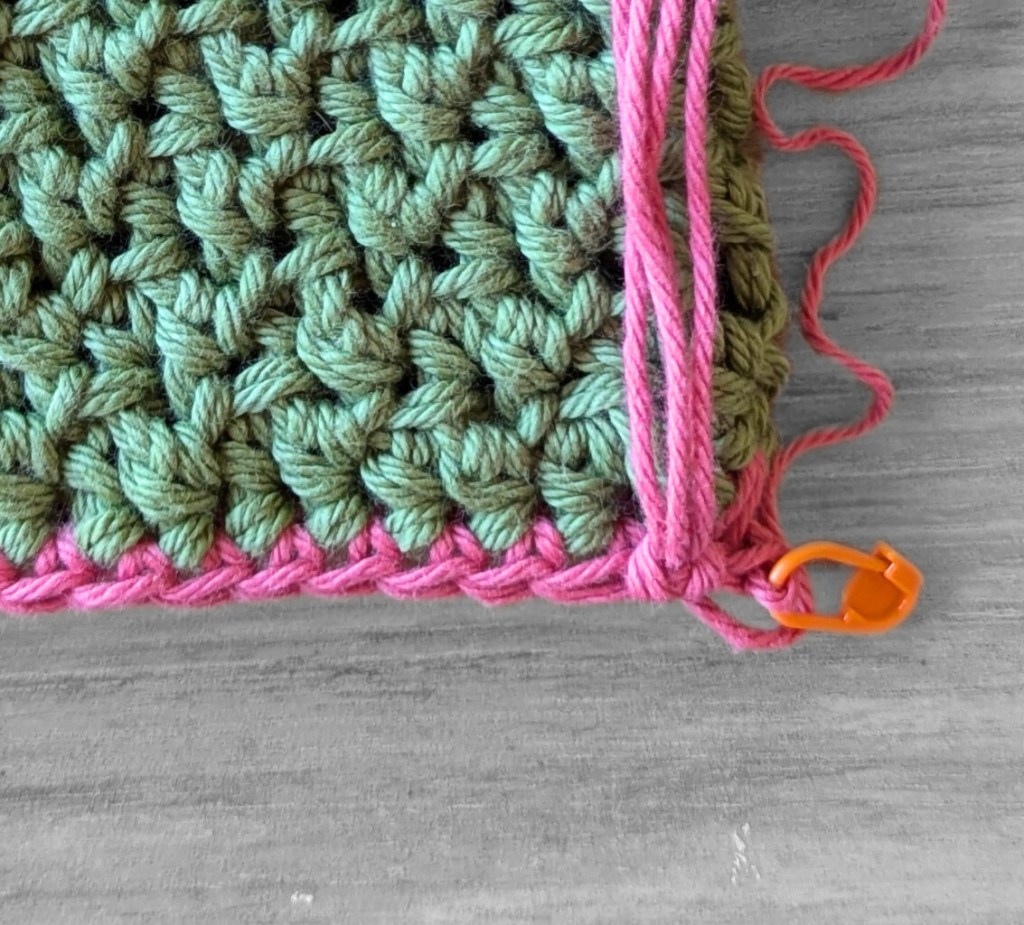
Completed fringe
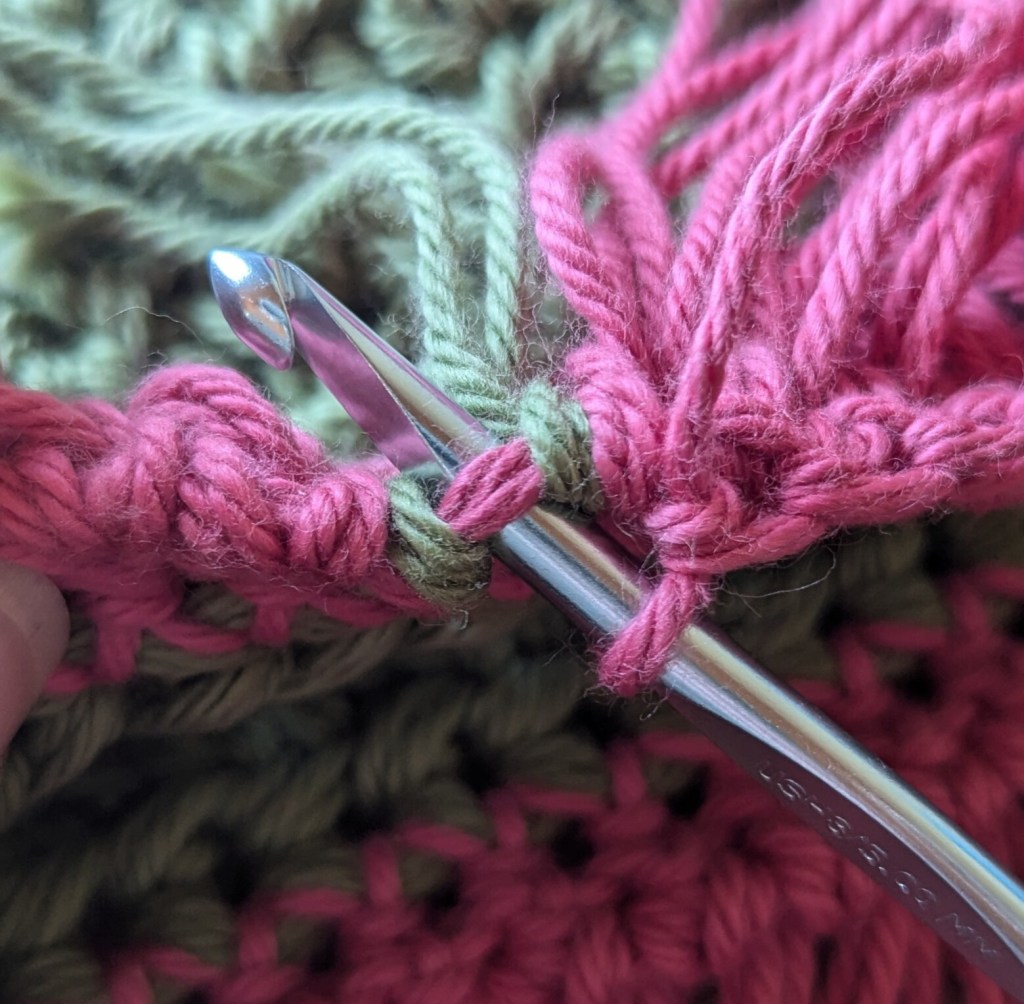
You are still working counterclockwise for round 14.
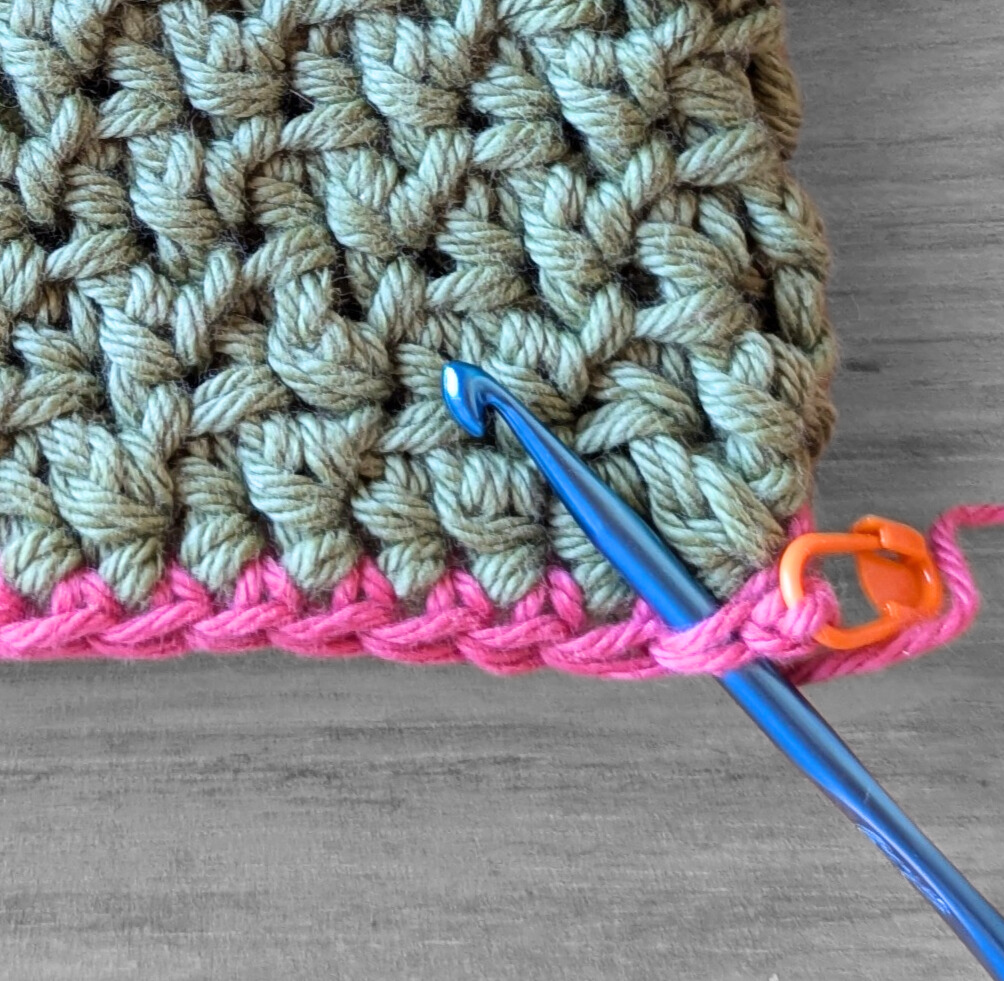
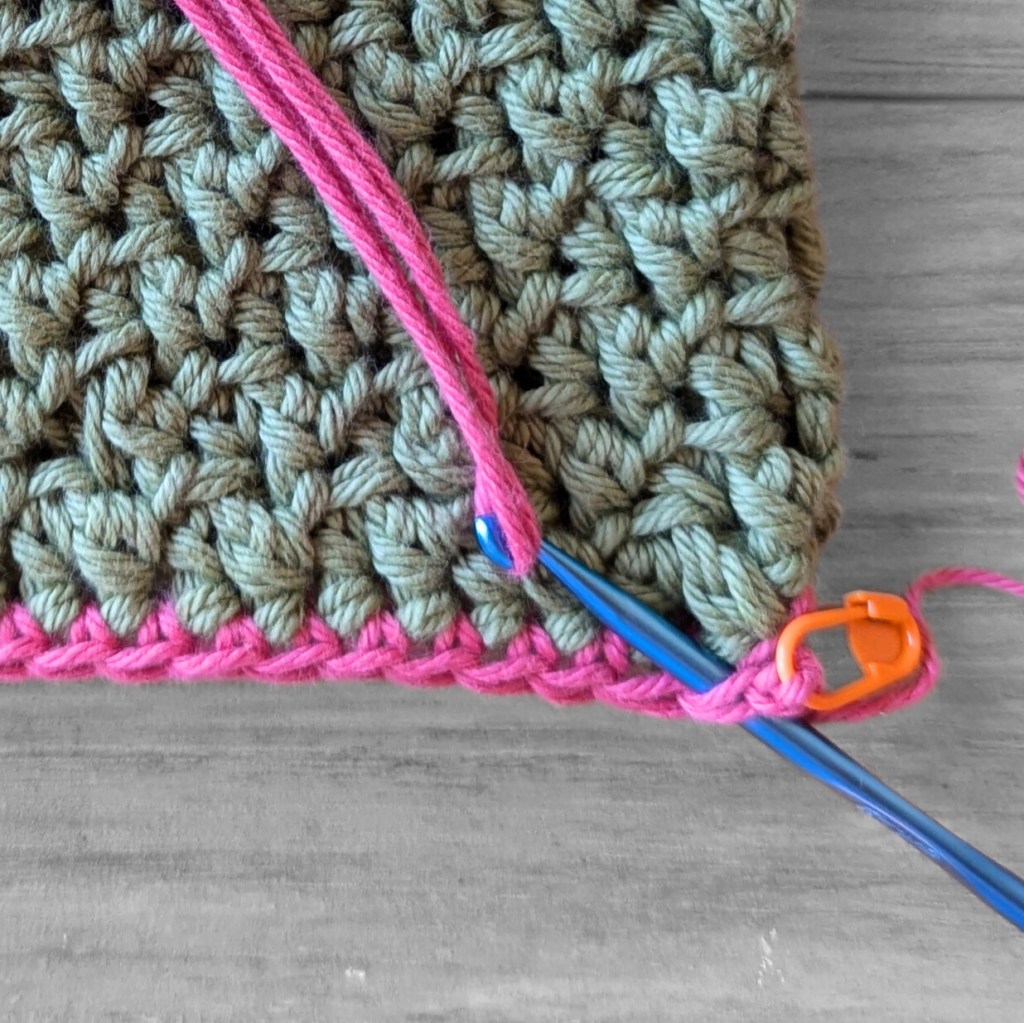
Rnd 14: Position hook back into working yarn, ch 1 * 1 sc in each st, being sure to place the sc between the strands of looped fringe. Join with sl st to 1st sc. (52 sc) Please see Photo for the placement of the sc in this round. In the example, I used green yarn to create contrast to see where the sc stitches should be placed.
Now you go back to working clockwise. This is the normal direction of working crochet.
Rnd 15: 1 sc in each st, Join with a sl st in first sc. (52 sc)
Rnd 16: Ch 2 then 1 HBhdc in each st, Join with sl st in first HBhdc, or you can use the invisible join instead. Weave in all ends if you haven’t done so already. (52 HBhdc)
Now it’s time to sew the crochet bag to the zipper bag.
First, open the zipper bag, this will make it easier to position the bags together. Align the last round of the crochet bag with the edge of the canvas bag, ensuring both bags are centered and evenly positioned. Hand-sew through both layers, stitching close to the zipper for a clean appearance. Adjust the placement as necessary while sewing. Once you finish, secure the thread.
If sewing isn’t your thing, you can also use a hot glue gun to attach the bags together. This method creates a cleaner interior finish, as you won’t see the stitches from sewing. Day’s Crochet has a wonderful tutorial for this process, which can be found here https://www.youtube.com/watch?v=Oqz0wRoEaIg&t=978s
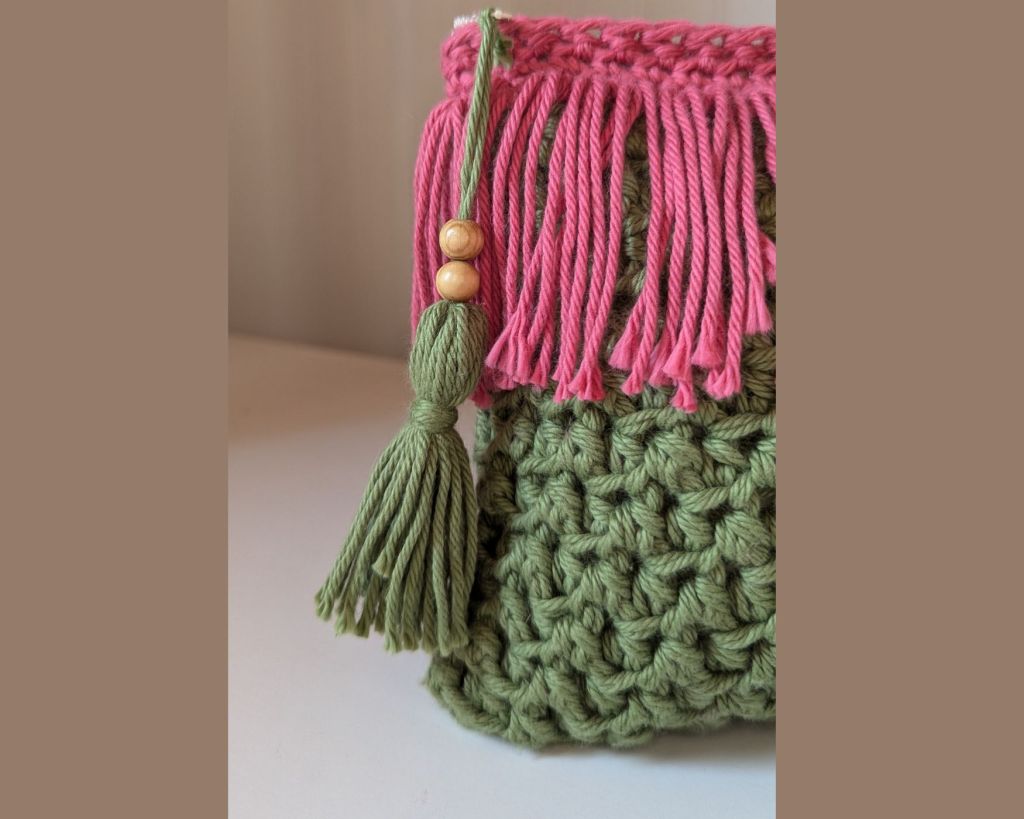
Now for the zipper tassel.
Grab the yarn you chose for your tassel and wind it around the cardboard you used to make your fringe approximately 10-12 times. You can wrap the yarn fewer times for a less full tassel or more for a fuller tassel. Next, take a piece of yarn approximately 8 inches long, secure all the loops and tie tightly. Cut across the other end. Wrap another piece of yarn 4 times around the tassel 1″ down from the tied end. Fasten off securely. Trim the ends to the length you want. Now, use a small crochet hook or yarn needle to thread the beads you are using to the loose end. Secure to the zipper pull. You are finished!
Thank you for selecting my pattern! I hope you had as much
fun crocheting your Raspberry Groove Clutch as I did
designing it!
The pattern and photographs in this document are the property of Lady Yarns Alot. You do not have my permission to sell, share, copy, or duplicate this pattern. No unauthorized reproduction, in whole or part is allowed. Thank you very much for following these rules!

Leave a comment